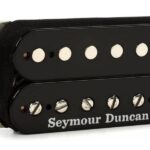
Humbucker and p90 are well-known guitar pickup types. However, they differ in their distinct tonal characteristics. Humbucker pickups are excellent for more bass, while p90 pickups produce brighter tones.

As a guitarist, you might have to switch between these pickups depending on the tone you want.
That said, if you want to replace your Humbucker with a p90 pickup, here is an extensive guide to walk you through the process.
Whether you are an amateur or a seasoned guitarist, these tips will help you successfully switch between pickups. Also, you get to explore the several sonic possibilities of your guitar!
Contents
- 1 Steps to Take While Replacing Your Humbucker Pickup With a p90 Pickup
- 1.1 Step 1: Prepare the Work Area
- 1.2 Step 2: Remove the Strings
- 1.3 Step 3: Clean the Guitar
- 1.4 Step 4: Disconnect the Wiring
- 1.5 Step 5: Remove the Humbucker Pickup
- 1.6 Step 6: Mount the p90 Pickup
- 1.7 Step 7: Figure Out the p90 Pickup Wiring
- 1.8 Step 8: Connect the p90 Pickup Wires
- 1.9 Step 9: Test Your Guitar
- 1.10 Step 10: Restring the Guitar
- 2 Takeaway
Steps to Take While Replacing Your Humbucker Pickup With a p90 Pickup
Replacing your Humbucker pickup is relatively simple and doesn’t require a lot of tools. In fact, you might already own all the tools you need.
Here is a list of the tools you need to own to replace your Humbucker pickup:
- Screwdrivers
- Soldering iron and solder
- Wire cutter
- A knife or any sharp blade
- A rag (to prevent damage to the guitar when needed)
The soldering iron or solder are probably the only tools on this list most people won’t have. Don’t fret, they are cheap and you can easily get them at retail stores around you.
Once you have these tools, you can begin replacing your Humbucker pickup. Remember, your p90 has to be the right fit.
Hence, consider the size, routing, and mounting options. That said, here are the steps you need to take to replace your Humbucker pickup.
Step 1: Prepare the Work Area
You will need to access both sides of your guitar for the replacement process. As a result, you need to find a space where you can work on it without banging it around. Often a clear table or desk will do just fine. However, most guitarists prefer to work in a well-lit, clean, carpeted area to lower the chances of scratching the guitar’s body.
Step 2: Remove the Strings
You can use automatic tuners to unwind the strings. But you can also opt to unwind the strings using your hand.
Just keep losing the key till the strings slack then you can snip the strings with your wire cutter. This step is vital as it provides you access to the pickup cavity.
If you want to change your strings, this step offers an excellent opportunity. Also, you might want to take out the saddle if it would move around and cause damage.
Step 3: Clean the Guitar
After removing the strings, you can clean the guitar’s body and the fretboard. Rid it of any dust or grime that might have accumulated over time. Wipe the fretboard and polish the frets.
While it might seem insignificant, cleaning the fretboard and polishing the fret does have an effect on the guitar’s playability.
If you have a dull-looking fret, wipe it clean till it shines. You will be amazed at how greatly it affects how you play.
Step 4: Disconnect the Wiring

Turn the guitar over and fish out the points where the Humbucker pickup wires are connected to. Plug your soldering iron to heat it up.
After it is heated up, press the soldering iron against the point where you want to remove the pickup wires. Within a few seconds, the solder around the wire will liquefy. Now you can easily take out the wires.
Note: As a rule of thumb, place a rag over your guitar’s body while you are desoldering the wire’s solder. This way, you don’t make a mistake and dent the guitar with your soldering iron.
Step 5: Remove the Humbucker Pickup
Once you have removed all the pickup wires, flip the guitar over to access the Humbucker pickup. Using a screwdriver or Allen wrench, unscrew the pickup mounting screws or adjustment screws. After removing the mounting screw, Carefully lift the Humbucker pickup from its cavity.
Step 6: Mount the p90 Pickup
If your guitar has pickup rings, the first step is to mount the pickup on the pickup ring. Often, there’s usually a disparity in size.
Your pickup might not fit perfectly into the pickup ring. Hopefully, you don’t encounter this problem.
However, this is a classic example of why you should do enough research before you get your pickup.
Once you have successfully mounted your pickup on the pickup ring, it is time for wiring. Ensure you note the wiring diagram and color coding of the p90x pickup.
Feed the wires of the pickup through the cavity. Carefully pull the pickup wires from the back of the guitar as you place the pickup in position. After this step is successful, screw the pickup ring in place.
Note: Ensure you have a good grip on the screwdriver while you screw the pickup in place. This way, you prevent slippage, which can dent your guitar’s body.
Also, pickups aren’t always mounted on rings. They can be directed mounted or pickguard.
Step 7: Figure Out the p90 Pickup Wiring
The p90 pickup often comes with a wiring diagram and color coding. These factors are particularly important when you want to sort out the pickup’s wiring. There are a lot of ways you can wire your guitar.
Plus, different setups require different wiring patterns. And the intention of the guitar plays a role in what wiring pattern to use. Hence, it is important to pick what works for you.
Step 8: Connect the p90 Pickup Wires
This step is relatively simple. However, it is a critical step, so ensure you take your time. A poorly soldered connection is bound to cause a lot of issues.
Undoubtedly, the last thing you would want is the internal wires to disconnect while playing for a gig.
This step involves combining the colors of the p90 wires with the corresponding connection on the guitar.
Solder the wire in place with a soldering iron. Hence, you should know how to solder. This step ensures that there is a strong and reliable connection.
Next, insulate the soldered wire connections with tape to prevent short circuits or other complications.
Here are some tips to note while soldering:
- Protect your guitar’s body
- Take out the tone/volume pots if you can’t reach them
- Work in a well-ventilated area as the fumes from soldering can be dangerous
- Get a stand for the soldering iron
Soldering is simple if you follow the required steps judiciously. Also, it is vital you get it right. Hence, it doesn’t hurt to take your time.
Watch a few videos and don’t stress when you make mistakes. You can also undo the solder and start again.
Step 9: Test Your Guitar

Often, many guitarists restring their guitars, close up the pick-up cavity, and then test the guitar. This process can be time-consuming if you made a blunder along the way while doing your wiring.
Hence, it is important that you test the guitar before you restring. You don’t need the strings to test your guitars. The only thing you need is a screwdriver.
Connect your guitar to your amplifier then touch the pickup screws or poles with your screwdriver. If you hear a light thud, the pickup is inactive, but if it is active, you will hear a lower thud.
Explore the pickup settings to ensure you have it wired properly. Test the volume and tone knobs. Watch out for any unusual sounds you didn’t hear before.
If you spot any flaws, compare the wiring you have made to the provided wiring diagram. Also, check your soldering.
Step 10: Restring the Guitar
During the process of taking out the Humbucker pickup, strings had to be removed. Now that the p90 pickup is well-placed and the wiring is perfect, it is time to restring.
You can restring based on the specific type of bridge and your tuning preference.
This step is meant to be relatively easy so ensure you follow the way you removed the strings and you will be done in no time.
Takeaway
While Humbucker pickup is excellent for specific tones, the p90 pickup performs better in some genres.
Whether you want a theme nearer to vintage sounds or want to try something new, replacing your Humbucker pickup is an excellent project.
By taking our guide a step at a time, you can take on the replacement process.


